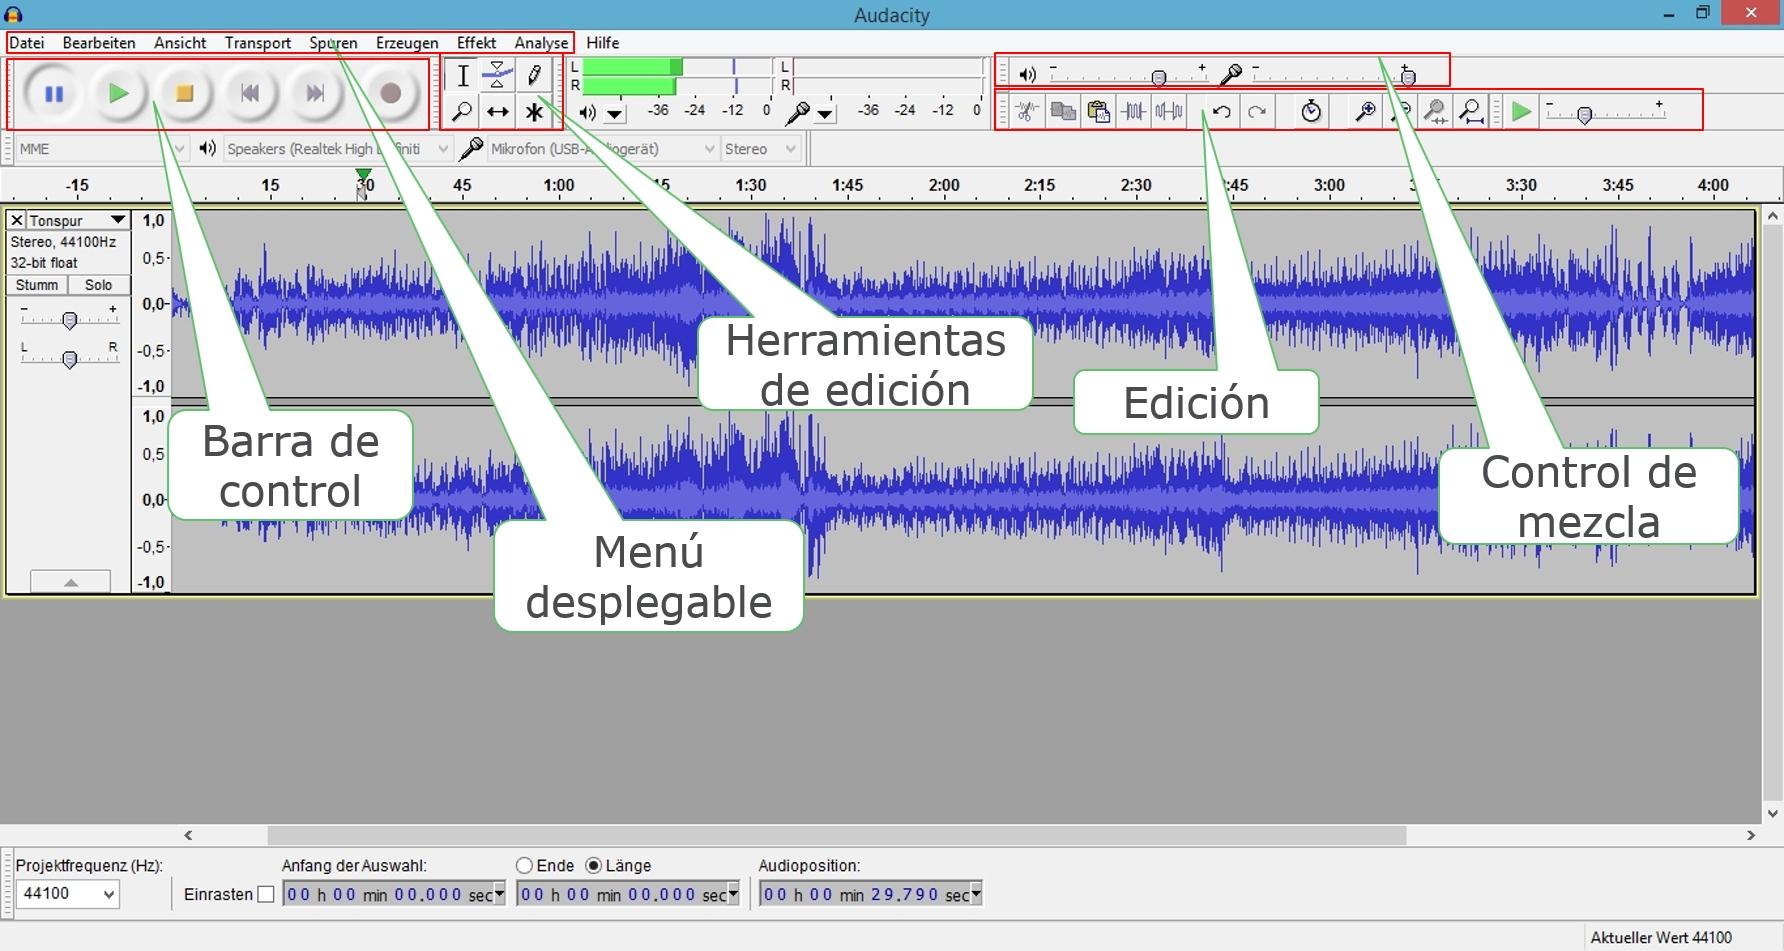
<p>Whether you’re a podcast producer, musician, or audio enthusiast, Audacity is a powerful and popular tool for editing and manipulating audio files. In this section, we will explore some of the basic functions and tools that Audacity offers, helping you get started on your audio editing journey.</p>

<h3>1. Importing and Exporting Audio</h3>
<p>Audacity allows you to import audio from various sources, including recording directly through your computer's microphone, importing existing audio files, or even capturing audio from external devices. You can also export your edited audio in different formats, such as MP3 or WAV, making it compatible with different devices and platforms.</p>
<p>To import audio, go to <strong>File</strong> > <strong>Import</strong> and choose the appropriate option. To export your edited audio, go to <strong>File</strong> > <strong>Export</strong> and select the desired format.</p>

<h3>2. Editing and Manipulating Tracks</h3>
<p>Audacity provides a wide range of tools for editing and manipulating your audio tracks. You can cut, copy, and paste sections of audio, as well as adjust the volume, fade in or out, and remove background noise or unwanted parts.</p>
<p>To cut a section of audio, simply select it using the Selection Tool (shortcut: F1) and press the <strong>Ctrl</strong> + <strong>X</strong> keys. You can then paste it elsewhere using <strong>Ctrl</strong> + <strong>V</strong>. For fading in or out, select the desired section and go to <strong>Effect</strong> > <strong>Fade In</strong> or <strong>Fade Out</strong>.</p>

<h3>3. Applying Effects and Filters</h3>
<p>Audacity offers a variety of effects and filters to enhance the quality of your audio. You can apply effects like reverb, equalization, or amplify the volume, as well as remove background noise or adjust the pitch and speed of the audio.</p>
<p>To apply an effect, select the desired section of audio and go to <strong>Effect</strong>. Choose the effect you want to apply and adjust the settings to your preference. You can preview the effect before applying it by clicking on the <strong>Preview</strong> button.</p>

<h3>4. Multitrack Mixing</h3>
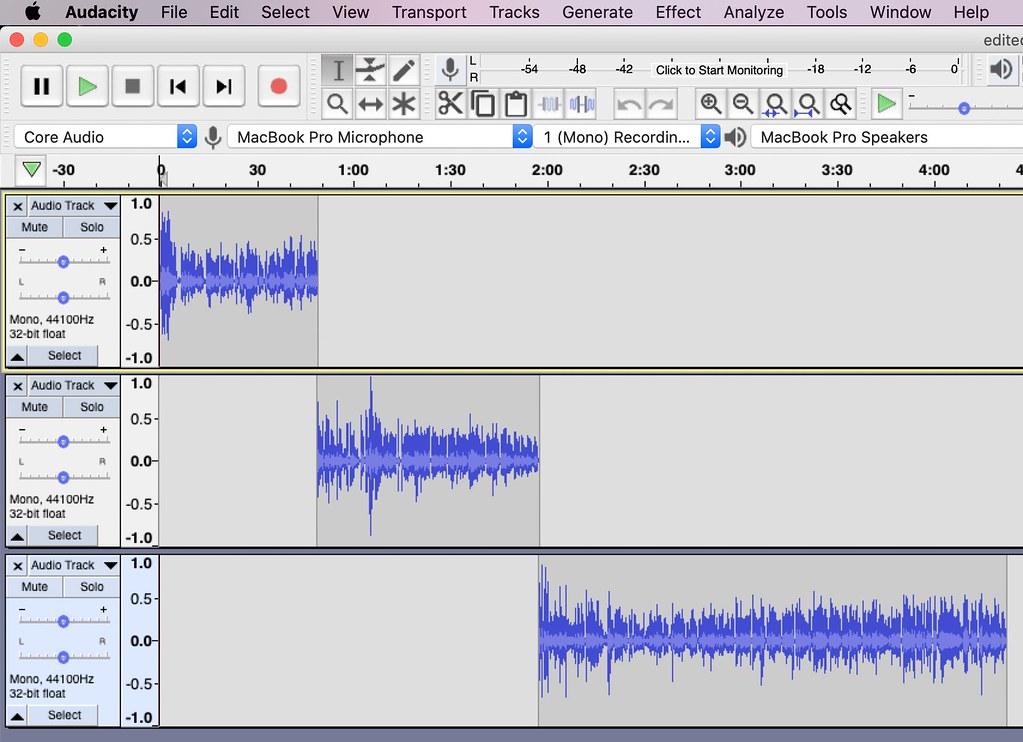
<p>Audacity allows you to work with multiple tracks simultaneously, making it perfect for mixing and editing complex audio projects. You can easily adjust the volume levels, pan the audio between speakers, and apply effects or filters individually to each track.</p>
<p>To add a new track, go to <strong>Tracks</strong> > <strong>Add New</strong> > <strong>Stereo Track</strong> or <strong>Mono Track</strong>. To adjust the volume levels, use the Gain/Volume Slider located on each track. You can also pan the audio by dragging the slider left or right.</p>

<h3>5. Recording and Monitoring</h3>
<p>Audacity allows you to record audio directly into the software. You can monitor the input levels and playback your recording in real-time. This feature is especially useful for podcasters and musicians who want to record their performances or interviews.</p>
<p>To start recording, click on the red <strong>Record</strong> button. You can pause and resume the recording as needed. To monitor the input levels, make sure the Input Meter Toolbar is visible. You can adjust the input volume by adjusting the microphone or audio interface settings.</p>

Originally posted 2024-01-18 07:16:49.
Are you looking to explore the world of audio editing? Look no further! In this article, we will guide you through the ins and outs of using Audacity, a powerful and user-friendly software for audio manipulation. Whether you are an aspiring musician, podcaster, or simply someone interested in audio editing, this informative guide will provide you with the essential knowledge and skills to navigate through Audacity’s features. So, let’s dive right into the world of audio editing and discover how Audacity can help you bring your creative projects to life.
Introduction to Audacity Software
Audacity Software is a powerful and free-to-use audio editing tool that allows users to record, edit, and mix audio. Whether you are a podcast creator, musician, or filmmaker, Audacity provides you with the essential features needed to take your audio projects to the next level. In this post, we will guide you through the basics of using Audacity and help you get started on your audio editing journey.
-
Getting Started with Audacity:
To begin using Audacity, you first need to download and install the software on your computer. You can find the latest version of Audacity on their official website. Once installed, open the program and you will be greeted with a clean and user-friendly interface. -
Recording Audio:
Audacity simplifies the process of recording audio by providing you with various recording options. To start recording, simply click on the red “Record” button. You can choose to record from your computer’s microphone, line-in, or external devices such as USB microphones. Audacity also offers the ability to record in stereo or mono, depending on your needs. -
Editing Audio:
After you have recorded your audio, Audacity provides a wide range of editing tools to enhance your recordings. You can easily cut, copy, and paste audio segments, adjust volume levels, and remove unwanted noise or background hiss. With the help of Audacity’s intuitive waveform visualization, you can precisely edit your audio to perfection. -
Applying Effects:
Audacity offers an extensive collection of built-in audio effects to enhance the quality and creativity of your recordings. From simple effects like reverb and echo to more advanced techniques such as vocal modulation and equalization, Audacity has you covered. Simply select the portion of audio you want to apply the effect to, choose the desired effect from the menu, and adjust the settings to achieve the desired result. -
Exporting and Saving:
Once you are satisfied with your edits and effects, it’s time to save and export your project. Audacity allows you to save your work in its native .aup format, which preserves all the editing options. Additionally, you can export your audio in various formats, including popular options like MP3, WAV, and AIFF. This versatility ensures that your final product is compatible with different audio players and platforms.
In conclusion, Audacity is a versatile and user-friendly software that empowers creators to produce high-quality audio projects. Whether you are a beginner or an experienced professional, Audacity provides the necessary tools to unleash your creativity. From recording and editing audio to applying effects and exporting your final product, Audacity has all the features you need to make your audio projects shine. So, why wait? Start exploring Audacity and take your audio editing skills to new heights.

Basic Functions and Tools in Audacity

Advanced Editing Techniques with Audacity
Audacity is a powerful audio editing software that allows users to enhance their audio recordings with advanced editing techniques. In this post, we will explore some of the most useful techniques for editing audio using Audacity.
-
Noise Reduction: One of the most common issues in audio recordings is background noise. Audacity provides a built-in noise reduction tool that helps to eliminate unwanted noise from your recordings. To use this tool, first, select a portion of the audio that contains only the background noise. Then, go to the “Effects” menu and choose “Noise Reduction.” Adjust the settings to reduce the noise, and apply the effect to the entire audio track.
-
Equalization: Equalization is the process of adjusting the balance between different frequencies in an audio recording. Audacity allows you to apply various equalization effects, such as high-pass or low-pass filters, to improve the clarity and quality of your audio. To equalize your audio, select the desired portion of the track, go to the “Effects” menu, and choose “Equalization.” Experiment with different settings to achieve the desired sound.
-
Fade In/Out: Adding fade-in and fade-out effects to your audio recordings can create a smoother transition at the beginning and end of the track. With Audacity, you can easily apply fade-in and fade-out effects. Select the portion of the audio where you want the effect to start, go to the “Effect” menu, and choose “Fade In.” Similarly, select the portion where you want the effect to end, and choose “Fade Out.” Adjust the duration and curve of the fade effect for a personalized touch.
-
Time Stretching and Pitch Shifting: Audacity also allows you to manipulate the timing and pitch of your audio recordings. This is particularly useful when you want to correct tempo issues or transpose the key of a song. To time stretch or pitch-shift your audio, select the desired portion, go to the “Effect” menu, and choose either “Change Tempo” or “Change Pitch.” Enter the desired values or use the sliders to make adjustments, and apply the effect to your track.
-
Vocal Enhancements: If you’re working with vocal recordings, Audacity offers several tools to enhance the clarity and quality of the vocals. For example, you can use the “Compressor” effect to even out the vocal levels, the “Limiter” effect to control peaks, and the “DeEsser” effect to reduce sibilance. Additionally, you can experiment with the ”Reverb” or “Echo” effects to add depth and ambiance to the vocals. Play around with these effects and find the combination that suits your audio best.
By utilizing these advanced editing techniques in Audacity, you can take your audio recordings to the next level. Whether it’s removing background noise, equalizing frequencies, adding fade effects, manipulating timing and pitch, or enhancing vocals, Audacity provides the necessary tools for professional-grade audio editing. So, dive in, experiment, and let your creativity shine with Audacity’s vast range of editing possibilities.
Recording and Editing Multiple Tracks in Audacity
can seem daunting at first, but with a little practice and the right techniques, you’ll be able to create professional-quality audio projects in no time. In this section, we’ll explore the various features available in Audacity that allow you to record multiple tracks, edit them, and enhance your overall production.
-
Recording Multiple Tracks: To record multiple tracks in Audacity, you’ll need a soundcard with multiple inputs or use a USB audio interface. Connect your instruments or microphones to the respective inputs, then select the desired input for each track in Audacity’s mixer toolbar. Click the record button for each track and start performing or speaking. Audacity will record each track separately, allowing you to adjust them later.
-
Using Label Tracks: Label tracks in Audacity can be incredibly useful when working with multiple tracks. You can add labels to mark specific sections or timestamps in your recording. This is helpful for aligning different tracks or for quickly locating specific parts of your project. Simply right-click on the label track, choose “Add Label at Selection,” and enter a descriptive name for each label.
-
Editing Multiple Tracks: Once you have your tracks recorded, it’s time to start editing them. Audacity offers various editing tools such as selection, cutting, copying, and pasting. To edit multiple tracks simultaneously, select the tracks you want to edit in the track control panel by holding down the Ctrl key (or Cmd key on Mac). Now any editing action you perform will affect all the selected tracks.
-
Applying Effects: Audacity provides a range of effects that can enhance your audio tracks. You can apply effects like EQ, reverb, compression, and many more to each individual track or to the entire project. To apply an effect to a specific track, select the track and go to the ”Effects” menu. Choose the desired effect and adjust the settings to your liking. To apply an effect to the entire project, select all tracks using the Ctrl or Cmd key and apply the effect as usual.
-
Mixing and Exporting: Once you’re satisfied with your recorded and edited tracks, it’s time to mix them together and export your final project. Adjust the volume levels of each track to achieve a balanced mix by using the sliders in the track control panel. You can also pan tracks to create a stereo or surround sound effect. After mixing, go to the “File” menu and choose ”Export” to save your project as a WAV, MP3, or any other supported audio format.
might require some learning and experimentation, but it offers a world of possibilities for creating professional audio projects. With its intuitive interface and powerful features, Audacity is a great choice for musicians, podcasters, and anyone looking to produce high-quality audio content. So grab your microphone, instruments, or audio sources, and start exploring the endless creative options that Audacity has to offer.
Exporting and Sharing Your Audacity Projects
Once you have completed your audio project in Audacity, it’s time to export and share your hard work with the world. Audacity provides several options for exporting your projects, allowing you to choose the format that best suits your needs. Whether you want to share your audio on a website, upload it to a podcasting platform, or simply save it as a high-quality file, Audacity has got you covered.
To export your Audacity project, go to the “File” menu and select “Export.” A window will appear with various export options. If you’re unsure which format to choose, the “Export as MP3” option is a safe bet. MP3 is a widely compatible audio format that can be played on most devices and platforms. However, if you prefer a different format, Audacity also offers options such as WAV, AIFF, and FLAC. Choose the format that suits your needs and click “Save.”
Before saving your exported file, Audacity allows you to customize the metadata, such as the track title, artist name, and album information. This is particularly useful if you plan to upload your audio to a music platform or podcast directory. To access the metadata settings, go to the “Edit Metadata” button in the export window. Fill in the relevant details and click ”OK” to save your changes.
If you’re planning to share your audio project online, it’s a good idea to export it at a lower bitrate to reduce the file size. This ensures faster uploads and downloads, without compromising too much on audio quality. In Audacity, you can adjust the bitrate by selecting the “Options” button in the export window. Lower bitrates, such as 128 kbps, are ideal for spoken word content, while higher bitrates, such as 320 kbps, are better suited for music with intricate details.
Once you have exported your Audacity project, it’s time to share it with the world. You can upload your audio to popular platforms like SoundCloud, YouTube, or your own website. When sharing on websites or blogs, consider embedding an audio player for a seamless user experience. Many platforms provide easy-to-use embed codes that you can copy and paste into your website’s HTML editor. Alternatively, you can share your audio project via a cloud storage service, such as Dropbox or Google Drive. This allows you to share a download link with your audience, making it easy for them to access and enjoy your content.
is a straightforward process. By choosing the right export format, customizing metadata, adjusting the bitrate, and sharing it on the appropriate platforms, you can ensure that your hard work reaches your desired audience. So, take the plunge and let your creativity shine through the power of Audacity.
Q&A
Q: What is Audacity and how can it benefit me?
A: Audacity is a free, open-source audio editing software that allows users to manipulate and enhance audio recordings with ease. It can benefit individuals interested in audio editing, podcasting, music production, or any other audio-related tasks.
Q: How do I download and install Audacity?
A: You can download Audacity by visiting the official website, audacityteam.org, and selecting the appropriate download for your operating system. Once downloaded, simply run the installation file and follow the on-screen instructions.
Q: How do I import audio into Audacity?
A: To import audio, go to the “File” tab in the menu bar and select “Import” or drag and drop audio files directly into the Audacity interface. It supports various file formats such as MP3, WAV, FLAC, and more.
Q: How can I edit audio in Audacity?
A: Audacity provides a range of editing tools. You can cut, copy, paste, and delete portions of the audio tracks. It also offers features like amplification, normalization, noise reduction, and pitch correction to enhance the quality of your recordings.
Q: Can I apply effects to my audio in Audacity?
A: Yes, Audacity offers a wide range of effects to apply to your audio tracks. These include reverb, echo, equalization, compression, and many more. You can experiment with different effects to achieve the desired sound for your recordings.
Q: How can I export my edited audio in Audacity?
A: To export your edited audio, go to the “File” tab and select “Export.” Choose the desired file format, such as MP3 or WAV, and specify the location where you want to save the file. You can customize the export settings, including the bitrate and sample rate, to suit your requirements.
Q: Is it possible to remove background noise from an audio recording in Audacity?
A: Yes, Audacity provides a noise reduction tool that allows you to remove or reduce unwanted background noise from your audio recordings. By selecting a small portion of the noise as a sample, Audacity can effectively reduce the noise throughout the entire recording.
Q: Can I record directly into Audacity?
A: Absolutely! Audacity allows you to record audio directly through your computer’s microphone or any connected external audio device. Simply click on the ”Record” button and start capturing your audio.
Q: Are there any online resources or communities available for Audacity users?
A: Yes, there is an active online community of Audacity users where you can find tutorials, guides, and troubleshooting tips. The Audacity Forum, Audacity Team’s official website, and various social media groups are great places to seek assistance or share your experiences with other users.
Q: What are some useful keyboard shortcuts in Audacity?
A: Audacity offers numerous keyboard shortcuts to improve workflow efficiency. Some noteworthy shortcuts include Ctrl+C for copy, Ctrl+V for paste, Ctrl+Z for undo, and Spacebar to start or stop playback. Exploring the software’s documentation will provide you with a comprehensive list of all available shortcuts.
Q: Can Audacity be used on multiple operating systems?
A: Yes, Audacity is compatible with Windows, macOS, and Linux operating systems, making it accessible for a wide range of users across different platforms.
Q: Is Audacity suitable for beginners with no prior audio editing experience?
A: Absolutely! Audacity’s user-friendly interface and extensive documentation make it an excellent choice for beginners. With a little practice and exploration, even those with no prior audio editing experience can quickly grasp the basics of Audacity and start creating professional-sounding audio projects. In conclusion, Audacity is a versatile and powerful audio editing software that can greatly enhance your audio recording and editing experience. By following the steps outlined in this article, you can confidently navigate through Audacity’s various features and successfully complete a range of audio editing tasks.
From importing and editing audio files to applying various effects and exporting the final product, Audacity offers a comprehensive set of tools that are both user-friendly and customizable. Whether you are a beginner or an advanced user, this software caters to all levels of expertise and provides ample opportunities for learning and experimentation.
Remember to always familiarize yourself with the different functionalities and shortcuts within Audacity, as this will significantly speed up your editing process and improve efficiency. Don’t be afraid to explore and try out different effects and techniques, as this will help you develop your own unique editing style.
Lastly, always keep in mind the importance of preserving the original quality of your audio. Audacity provides various features to manipulate and enhance your recordings, but it’s crucial to maintain the integrity of the sound. Avoid excessive editing and strive for natural and balanced audio that delivers a pleasant listening experience.
By following the guidelines presented in this article, you are well on your way to becoming a proficient Audacity user. With practice and continued learning, you will undoubtedly unlock the full potential of this remarkable software and create professional-grade audio projects. So, go ahead and dive into the world of Audacity with confidence, and let your creativity flourish!


